 |
|
 |
| About the Bluetooth module firmware updater |
|
 |
| Be sure to read the following instructions. |
|
| Bluetooth module firmware update Procedure |
|
|
| |
|
Precautions |
 |
|
|
| • |
Update file is different by model. Refer to <Target Models> for the models which update is necessary. |
| • |
Use the USB flash memory as the update media. |
| • |
Update cannot be performed with Disc media (CD-R/RW or DVD-R/RW). |
| • |
Be sure to park the vehicle in a safe place before updating. Keep the engine running in order to prevent battery from running out. |
| • |
Do not turn off the engine or Navigation/Multimedia receiver power while updating. Update cannot be performed correctly and the Navigation/Multimedia receiver may become unusable. |
| |
|
| |
Note: Please be advised that the settings on Your KENWOOD Audio Product will be cleared further to completing the Software Update, i.e. Paired Phones, User Settings, Voice Tags. |
|
|
| |
|
Introduction |
|
|
|
| • |
This document describes the procedure and precautions for upgrading the Bluetooth Module firmware. |
| • |
If an error occurs while updating the firmware, the Bluetooth Module may become unusable.
Be sure to read the following procedure and precautions carefully before updating the firmware. |
| • |
If you can use your cell-phone without problems, you do not need to update the firmware. |
|
| |
|
Target Firmware |
|
|
|
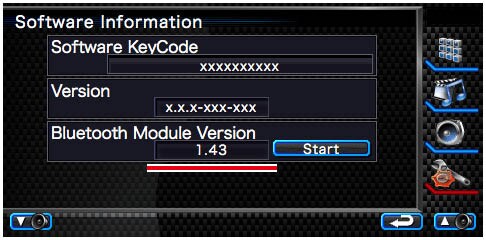
| This updater can be used to update the following firmware version: |
| |
Ver 1.43 or earlier
To check the firmware version, refer to "Checking the Firmware Version" below for information on how to check the firmware version. |
| By executing this updater, the firmware version will become "Ver. 1.60". |
|
| |
|
Target Models |
|
|
|
| This updater can be used to update the firmware of the following models. |
| |
DNX8120, DNX8220BT, DDX812, DDX8032BT, DDX8022BT, DDX8022BTY, DDX8032BTM |
|
| |
|
Work Flow |
|
|
|
| Preparation |
Check the firmware version and cell phone to check whether firmware update is required. |
| Step 1 |
Download the firmware update File and copy it to the USB Thumb Drive. |
| Step 2 |
Updating the Program |
| Step 3 |
Check that the firmware has been updated. |
|
| |
|
Checking the Firmware Version |
|
|
|
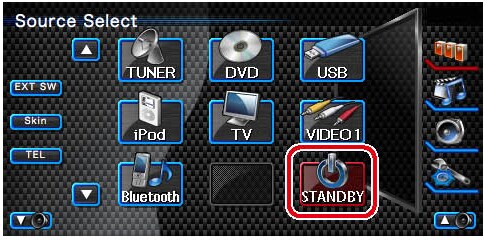
| 1 |
Display the Source Select screen
Press the [SRC] button. |
|
|
| 2 |
Select the STANDBY
Press the [STANDBY] button.
 |
|
|
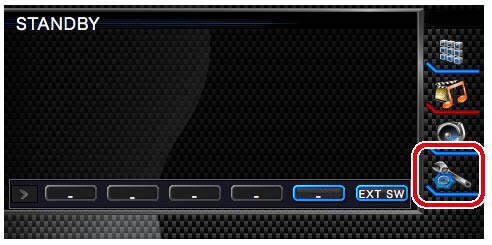
| 3 |
Enter Setup Menu
Press the [SETUP] button.
 |
|
|
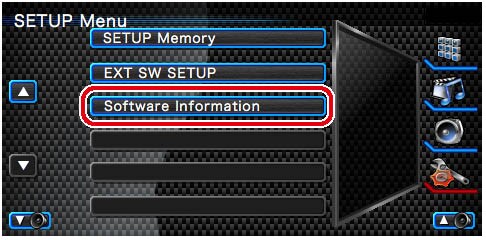
| 4 |
Display the Software Information screen
Press the [Software Information] button.
 |
|
|
| 5 |
The firmware version appears
 |
|
| |
|
Step1: Before You Get Started |
|
|
|
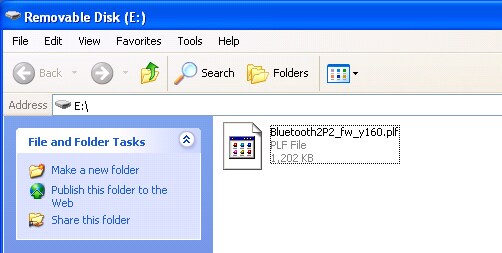
| 1 |
Insert a USB Thumb Drive into an available USB port on your computer. |
|
|
| 2 |
Download the Update File
 |
|
(1,214KB) |
|
|
|
| 3 |
Copy the Update File to the Root Directory of the USB Thumb Drive.
 |
|
|
| 4 |
Close the file and remove the USB Thumb Drive from your computer. |
|
|
| |
|
Step2: Updating the Program |
|
|
|
| 1 |
Insert the USB Thumb Drive into the USB Cable
Note: Do not insert the USB Thumb Drive into the USB port labeled iPod. |
|
|
| 2 |
Select the STANDBY
2-1 Press the [SELECT] button.
2-2 Press the [STANDBY] button.
|
|
|
| 3 |
Enter Setup Menu
Press the [SETUP] button.
|
|
|
| 4 |
Display the Software Information screen
Press the [Software Information] button.
|
|
|
| 5 |
Starting the Update
Press the [Start] button.
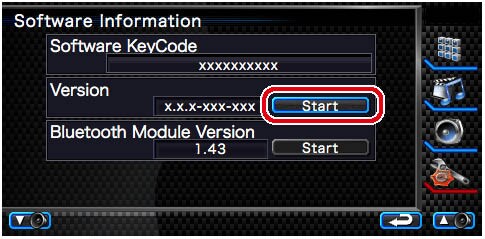
Caution: The screen may go blank for a few seconds.
Do not unplug the USB Thumb Drive or Power Off the unit during the Update Procedure. |
| |
|
| 6 |
System Reboot & Software Update Screens
When "Waiting • • •" is displayed, "Now Updating" is also displayed. |
| |
|
| 7 |
Once the "Update Completed" screen is displayed, remove the USB Thumb Drive and restart the unit.
Note: This will require you to turn the vehicle ignition to the OFF position. |
|
|
| |
|
Step3: Verify the Bluetooth Firmware Update |
|
|
|
| Verify that Firmware Version 1.60 has been updated successfully in the KENWOOD unit. |
| |
Refer to <Checking the Firmware Version>. |
| Your KENWOOD unit now includes the necessary firmware update. |
|
| |
|
Troubleshooting Instructions |
|
|
|
| If the Update file is corrupted |
| |
If the following "Update file error!!" is displayed, the firmware updater file which is copied to the USB thumb drive may be corrupted.
Perform the update procedure from the <Creating the Update Media> again. |
|
|
|
|